What To ExpectThese archived articles are most ideal if you are using CorelDRAW 9 or 10. Version 8 should still be similar enough to make the information useful, but version 9 had significant advancements. If you are using CorelDRAW 11, 12, X3, or higher, my updated CorelDRAW article series will be much better for you. This series of articles will be of interest to anyone involved in graphic design. File sharing is an important part of graphic design, so I focus a lot on key principles to successful file sharing. These articles are intended to illustrate things you will not find so easily in a book or training course. I do use a tutorial type format suitable for all levels of experience, but the purpose is to cover design principles, not just step by step processes. |
One of the advantages to being an independent freelance contractor is that you can control your overhead. Maybe you are like me and already have several programs installed on your computer. Perhaps you do not have an artillery of software and you are wondering what is the best. Buying the most expensive products is not necessarily the best solution.
I originally wrote most of these articles in early 2002, but the material is just as relevant now, at the end of 2007, as it was then. In fact, these updated versions will be demonstrating with the same CorelDRAW 9 software because I want to illustrate a point; Corel was ahead of its time.
Macromedia, before they were taken over by Adobe, had made some impressive progress over their older products since the release of their MX versions, but Corel had many of those ideas first. Adobe had added features to their products, but they were so stuck in their ways, they had very little true innovation. Corel has consistently offered more productivity with more simplicity. No graphics software that I am aware of can be customized as much as Corel.
I am about to introduce you to why I feel the CorelDRAW Graphics Suite is the program of choice. Since Adobe Illustrator enjoys the prestige of dominating the market and is considered the industry standard in graphic design, and since many graphic designers favor the Mac platform, this touting of Corel on the PC might seem unusual.
Welcome to a world where Corel rules. I will share secrets where we can laugh at the prevailing attitude that Corel is not a real design program, and profit from that misconception. We will do things the big boys either can't do, or make you spend more money to be able to do. We will do it in less time, with less training, and with less effort. Corel does have one fault, it is so powerful and easy to use, it can be dangerous.
Once you read this, you have an unfair advantage. Other design programs maintain their position of power by being difficult to learn. It gives the designer an ego boost when they can master it. How dare someone simplify the process! If you still need to lord your power, Corel does have something for you; you can read almost any file in Corel. If you want to be nasty, you can do things the other programs can't even read, much less do.
These articles will be balanced because I do use the expensive software. I have spent thousands of dollars just on training classes to learn Adobe and Macromedia programs (I feel like I fell right into their marketing plan). They all have pros and cons, but the truth is, it is possible to design successfully using Corel exclusively. If you don't have thousands of dollars to spend and want the most flexibility, this is important.
Now that Adobe has taken over Macromedia, and their first fully hybrid Suite became available in 2007, things are indeed interesting. There are things I like about the Adobe CS3 Suite, but you have to shell out a lot of money for it. Whether or not the product has improved in proportion to the price they charge is debatable, but they are in the enviable position of having eliminated Macromedia from the competition. This makes Corel an advantage if your funds for buying software are limited and you still need great functionality.
These are just some of the long standing advantages of Corel:
I have used Corel to successfully share files over the Internet for thousands of production jobs. That does not mean the people producing the jobs were using Corel, I simply converted it to the format they needed to produce the job. Translation between programs can sometimes be challenging though. I will cover some of those difficulties and their solutions in this series.
I will begin in this article with some of the basics, but in future articles, we will progress toward more complex design techniques. I am using CorelDRAW 9 for these demonstrations, so those using CorelDRAW 11 or higher will benefit more from the revised versions of these articles. Even though it is a 1999 release, version 9 had functionality that still rivals newer competitive products. It is powerful enough to meet your graphic design needs, and in my opinion, crossed a threshold in modern computer graphics. CorelDRAW 10 is very similar, so these articles will work well for you if you are using version 10.
Since spending top dollar for graphic design is not absolutely necessary, you might consider older software versions which can easily be found at a bargain. Even if you buy new, the $400 price tag on CorelDRAW Graphics Suite is a lot less than buying Photoshop at $650 plus Illustrator at $600 (Corel bundles their DRAW, PHOTO-PAINT, and others together for $400 or less). To actually get the multi page document capability in Adobe, like CorelDRAW has, you would also need InDesign which costs another $700. Be sure to read Corel's Upgrade policies and you can get the program for less than half price at $180.
You cannot be as efficient as possible without first setting up the program, so that is a good place to start. If you have been using Corel and have not ventured beyond the default settings, you might want to see what you have been missing. Corel is fully customizable.
There are ways to customize your tools in other graphic design programs and it can be done in three easy steps:
Macromedia had made some progress to offer more customizing options, but it is going to take a little longer than the above instructions to show you some of what you can do in Corel. These demonstrations will be done in CorelDRAW, but it is essentially the same in PHOTO-PAINT.
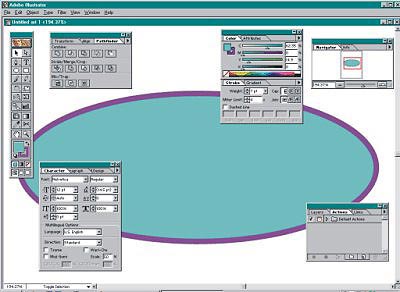
I like the way the Corel people think. Look at the screen for an older Adobe Illustrator below which hasn't changed much in several years. Notice when you zoom in on an object, and I just used a simple ellipse here, the docked tool palettes partially cover the graphic, though I have arranged them for less obstruction. I have no idea why they call these palettes, because to me, most of them are tool boxes. OK, so you can get rid of these "palettes" easily, but you bury the editing options when you do that; or you can do like I do and memorize a lot of keyboard shortcuts. Adobe is very oriented toward drop down menus, but I feel the drop down menus are not as efficient as having the tools readily available on the screen.
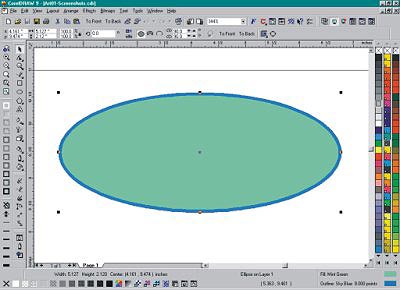
Now look at a screen for CorelDRAW below. Notice that the tools all surround the outside, and the graphic is unobstructed. Older versions of Corel did use floating dockers, but starting with version 9, you get to choose whether you want to float them or keep them out of your way. I like having the choice.
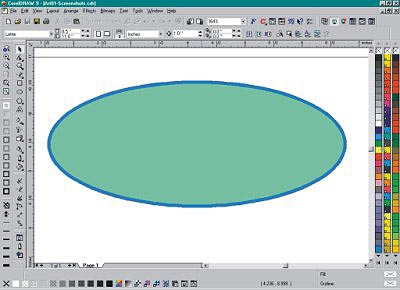
If you are using the default settings, your screen will look different from the one above because mine is customized to the way I work.
Beginning with the top of the Corel screen, the Menu bar is common to all Windows based applications. The Menu bar is the one that says File, Edit, View, and so on, for all of you who are definition challenged. Below that, all the other toolbars can be customized any way you choose. You can control the following attributes and more:
The best way to customize is to determine all the things you can think of for your "wish list" and set your workspace up accordingly. Once that is done, just start working. If you notice that you seem to always need a certain tool that is not where you would like it, you can add it in. Do it right away so you don't forget. If there is some default behavior you don't like, you can most likely change it.
I recommend staying reasonably close to the defaults when you customize. If you change things too much, you may find yourself stumbling around if you work on another computer after getting too used to being over customized. It should be enough to add tools you use to a logical location, rather than moving everything around just because you can.
I will be showing you how to add an icon to your toolbar, so that with a single click, you access the tool options. Once you are comfortable with all your customization, I highly recommended that you also create a backup of your customized workspace. I will walk you through that process later.
The top row of icons, known as the Standard toolbar, is there by default, but I have added some to it. The second row is one of the features that have caused me to love Corel (other programs have now copied this feature but not as well). It is called the Property Bar. It changes for every task or object you are working on. When you have nothing selected, it displays general information like page size and orientation, unit of measurement being used, and so on. You can take away or add anything you want, as long as there is room, or you are comfortable with how much space it takes up.
Click on the graphic above for a larger
image and more detailed information.
Ready for more great ideas coming from the Corel people? Every object you select will change the Property Bar, and the tools will be just what you need to work on the selected object! It gets better. You can customize every Property Bar!
|
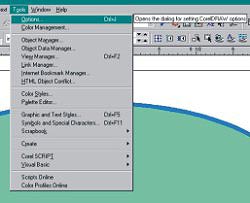
Let's start with adding the icon to your Standard toolbar so you have instant access for all the fine tuning you will want to do. Make sure that no objects are selected. Click on Tools from the Menu bar and select Options. Using the combination of the Control and J keys will do the same thing. |
This will bring up the Options box shown below.
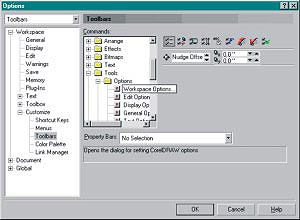
This procedure will be used for every toolbar you want to customize. To customize the Property Bars mentioned above, click on the type of object you want to work with (like text, an ellipse, or any other object), then use the Options button you just added. You will find that the default Property Bar settings are usually all you need, but if there is something you would like that is not there by default, you can add it while the object is selected.
Exactly what you will want to include depends on the design work you do. Go ahead and explore all the options. Find out what each tool does and decide if you want it more easily accessible or not. All of the features you can place shortcut icons for on your toolbars can be accessed through the drop downs in the Menu bar. Many of them have a combination of shortcut keys. These keyboard shortcuts are listed either by holding the mouse pointer on the icon for a second, or on the right side of the drop down menus.
Here is another Corel idea I really like. There is a Status Bar which by default is on the bottom. Mine is customized so yours will look different. It displays information about the selected object, and yes, it can also be customized. Using the procedure described above, you can select Status Bar from the list to customize the information displayed.
This is the same screen as the Figure 2 above, except the ellipse is now selected. The Property Bar shows the tools needed to manipulate the ellipse, and the Status Bar at the bottom displays object information.
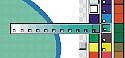
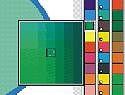
Here is something even many Corel users are not aware of, and no one else makes color this easy to work with. Filling an object is fairly standard; you select the object, then click a fill color from the palette. If you right click on the palette in Corel, you will be selecting the outline color. Now comes a more hidden secret; if you click and hold the mouse button on a default palette color for a second, you will get a flyout of several similar colors as shown on the top of Figure 7. On the PMS palette, you will get a 0 to 100 fill percentage scale in 10% increments as shown on the bottom of Figure 7. Pretty cool, eh. |
|
By the way, if you notice the multiple palettes I have, that is an option added in version 9. I have the default palette for simple design work, the PMS palette for most graphic design, and the Internet palette for designing web graphics. Multiple palettes are easy to add too. Right click any open spot in your workspace, point to View, then Color Palettes, then pick from among the many choices. You can also rearrange them any way you want.
Once you have reached the point where you like the workspace you have customized, you need to save it so you can also back it up. This is also very useful if multiple users are sharing the program, or if you want different setups for different types of design work. Everyone can have their own custom Workspace(s). Here is how to do that.
Click on the Options icon you added earlier (the double checkmark icon). The Options box shown below will come up and the _default will be automatically selected the first time you do this.
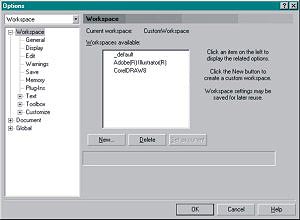
Click the New button to bring up the New Workspace box.
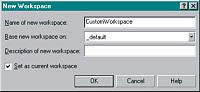
When you type in a name and click OK, it will be automatically set. That is all there is to it. To make a backup, the file will be on one of the paths below by default. This assumes you installed Corel on the C drive, otherwise substitute the drive you used.
C:\Program Files\Corel\Graphics9\Workspace\CorelDRAW9
If you don't find it at the location above, check the following location for your custom Workspace (substitute the "#" for your version number).
C:\Documents and Settings\**\Application Data\Corel\Graphics#\User Workspace\CorelDRAW
** This will be "Administrator" or whatever user name you use on your computer.
When you were saving your custom Workspace as shown in Figure 8 above, there is also another choice for setting Document options. One of the powerful features in Corel is that you can choose to have a default for all new documents and change single documents without affecting the defaults for other documents. Check out the settings you can make in the Document section. When you click on Document next to the + sign, and select the Save options as defaults for new documents, you can make all new documents you create have the default settings of your choice.
I will refer back to this material in future articles as I show you how to do some fun design tricks. I keep the tools I need readily available without having to pursue them down some daunting list of hide and seek options. Until next time, see how you can use this information to increase your productivity. Take time to explore the customizing you can do in Options. You will be amazed not only by the options, you will discover that Corel can be used for a lot of different design work.
Next.. The Secrets of File Sharing.
Steve Chittenden owns and operates Creative Business Services which provides web design, graphic design, writing, and marketing services. If you have a web site that could benefit from this CorelDRAW 9 material, please feel free to link to these pages.